Friday, 29 March 2013

knitty neck hugs

Oliver Twist yarn pack neck hug
In my last post I mentioned my neck hug. I wear these a lot. When I was very small, my ma and grandma used to knit 'polo' necks with an extra panel front and back which sat inside our jumpers. These were amazingly effective and designed to 'keep the chill off your chest'.
We grew up in old houses without central heating, when duvets were eiderdowns and winter mornings were a race to get dressed and yes, jack frost painted the insides of the windows with beautiful patterns.
Morph forward to a few years ago and into my passion for textiles.

Oliver
Twist
'Happy Pack'
in Orange
My lovely friend Debbie Cripps introduced me to yarn packs made by a company called Oliver Twists... you can buy them here in Debbie's store Craftdepartment.com Whenever I taught a class for Debbie at her store, I'd come home with at least one pack. The packs have lengths of different yarns carefully selected in delicious colour palettes, a definite stash favourite. My first neck hugs were worked by knotting all the lengths in a pack together, rolling it up into a ball and then knitting them as a long strip (no fancy knitting skills needed, (just keep knitting 'til the yarns all used).
To finish off, one short side is stitched to one long side to make a V and viola! the perfect knitty collar to sit in a neck line and keep you warm, whilst indulging in a lovely colour mix of textured yarn.

soft and snuggly neck hug using three fancy
yarns together
I love yarns almost (only almost) as much as beads and there are Sooo many truly scrumptious ones, but seriously, I am pants at knitting garments and way too time starved for craft hobbies that take too long.
My solution is to indulge the yarn desire with a purchase of just one ball or hank.
Current neck hugs are knitted as a short row to make the same long band, and stitched together in the same way. You can knit a bunch of thinner yarns together with bigger needles too.
I wear my neck hugs all winter because.... big reveal....
They are just perfect for showing off a beaded brooch.  I'm often asked for an instant tutorial and I've discovered that many beaders are yarn stash hoarders too.

Turquoise neck hug with Winterfleur brooch

Quick tutorial
Turquoise neck hug so you can see the shape
1 or more lovely yarns or Oliver Twist yarn pack
1 pair knitting needles (2.5mm - 5mm depending on yarn thickness)
cast on approximately 15 stitches (8 - 10 for a chunky bunch of yarns.)
Knit until you have about 60cm.
Cast off.
Sew one short end, to the side of the other short end.
Pull over your head and add a gorgeously beaded brooch.

Tuesday, 26 March 2013

beetle brooch update

beetle beads and a rivoli treat
So here, I showed you my latest beetle, and I was getting excited to teach it for the first time... but before I did, there was just enough time to try it out a couple more times with different beads. first, in what seems to be a seasonal ritual at this time of year, I went for really bright and cheerful colours.
Those pink pearls are the new Swarovski Neon... exactly the same shade as a little over jacket we were given at small school to help us show up on gloomy winter walks to school. In those days it was called fluorescent, and was very exciting. In my teens it re-appeared as 'Day glow' inks and dyes splashed across graffiti fashion prints. Now it's back again as Neon. I'm not a fan, usually, but am converted by using them in this minimalist way!
Colourful beetle
The beady stash was my shopping to go with the Neon pearls (plus, ahem, some delicious Rivoi's... for another project). I added a splash of turquoise, plus pearl 'knees' to help illustrate a beady moment in class.
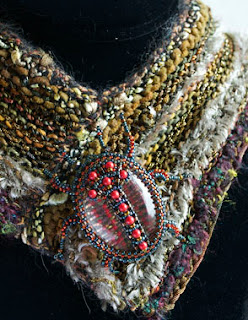
The beetle I'm wearing the most, sits on my 'neck hug' scarf and is more like the colouring we find on beetles hiding in the English shrubbery. Sparkly pewter with rusty dark coral pearls.

So how did the class go?
Garden beetle on a neck hug
Well, the group I designed the beetle for has a wide range of beady experience, from artists already beading up gorgeousness, to beginners just getting to grips with thread tension, but best of all for me, a collective good mood and willingness to play! they all did a brilliant job of creating colourful beetles.
For myself, I'm de-constructing and re-arranging the order in which the components are put together, which I think will help future students who are at the start of the beady learning curve, as it will sort out some thread tension issues.
For me, teaching practice and instructions for class, are constantly under review. I'm listening out for sticking points, watching how many different ways the instructions get used in class, refining, adding, re-writing, making notes to answer questions that come up... it's an exciting organic process, one which has to adapt quickly to every new room full of students.
Can't wait for the next one!

Monday, 11 March 2013


Do you also have a habit of arranging temporary still lives on window sills and shelves?
For me, these sometimes kick start new design ideas, always make me wish I had time to stop and draw or paint, often give rise to new colour combinations and definitely make me feel happy when I look at them. They are also a really handy way of making the place look cared for when there's no time for rigorous housework... when is there ever!
lasp gasp bouquet! The Scented
Broom smells amazing.
I was buying flowers from a street stall, because they stopped me in my tracks, because they filled me with desire to gaze at them more, and it made me think about how I really choose colours for my designs. In class I often get asked about colour, and try to explain how I soak it up all day long, and relish in colour with feeling. Yet somehow people see my work and say, 'Oh, those are so your colours!' The florist stall has a brilliant 'last gasp' offer on bunches of flowers that are past their best. So for pennies you can have glorious blooms, usually hugely expensive ones, if only for the briefest while. These are the ones I chose.

paper bag vase
I also picked out a bunch of paler pink ones, and have put them in a glass inside this beautiful paper bag, I love the cheerful mixture of pinks and greenish turquoise. The bag is just so pretty and inspiring it deserves an extended life as a vase. Recognise the little lustre pot next to the paper bag? 
The table cloth is a linen tea towel, I seem to collect these along with my china and they make cute backgrounds for photographs, far to nice to use for the washing up!
Anyway, you can see that I'm definitely getting back into softer colours and pink again!
bead stash for a new project idea


I had a morning off this week, to visit my friend Zoe's bead shop in Frome in Somerset. This is a shop you definitely have to go to and relish, with at least half an hour to spare and any significant other parked in a coffee shop until you are done. 

It is a real treat moment for me, a perfect antidote to pre-spring blues. The walls are covered with beautifully made beady jewellery from around the world, and there are many trays of 'other' beads. In no time you'll have a packet of scrummy goodies! Inspired by the flowers, and with a project in mind that needs to be done, I chose silky matt glass long beads, little flower round beads and some in betweeny beads.
Once home I put these with some gorgeous Lucite flower beads and seed beads from my friend Lynn's store. But somehow, despite thinking I'm picking out new colours for me to play with, there is a definite familiarity about the choices I've made. But for now I'm in love with this soft spring mixture and I'll post a picture of the finished project soon.

Friday, 8 March 2013

Beetle brooch

I promised to reveal my latest beading, hinting that it has six legs... so here's how it all began...
A few months ago my lovely facebook friend Jose Luis Rios sent me a gorgeous picture of some beetles, knowing as he does about my love of beading creepy crawly things. It's the kind of fun challenge I relish, and one I wanted to do my best with as Jose is an awesome bead artist himself.

Mesquite bug (?) A kind of leaf beetle
just like the ones in Jose's picture
The colours and shape of these bugs are just stunning. The picture sat on my desk for the longest while, prompting many doodles in my notebook. Next came an invitation from one of my favourite bead groups to come teach, and... can we have a creature to bead please?

It would be really easy to trot out an existing pattern, but also sitting on my desk gleaming somewhat temptingly at me, were some oval glass cabochons which I've been itching to use. These arrived along with the gorgeous round ones I've used in the Winterfleur brooch. I've been completely charmed by the way the glass magnifies anything it is laid over.... so why not use some beads in a pattern behind the glass, I thought.
New beetle brooch I'm going to
have the bead group choose a name.
Firstly though, a direct copy of the Mesquite bug into beads, although definitely on my to do list, is probably not what  people will really want to wear on their jumpers! So I softened the shape to utilise the oval cabochon and look more like the familiar scarab or ladybird beetle shapes. There were a few false starts, but I finally got the beads to behave. With a project like this it's definitely the technicalities that take me the most time, with questions like, how are you going to attach the brooch pin? just how do you attach and shape spindly legs and antenna using beads and thread, needing to be answered. Then comes the question, just how are you going to break it down into steps for beaders to enjoy following. So it goes slowly, slowly until the solutions take shape. The beetle brooch is a mix of techniques and uses five different bead types including Swarovski pearls. I've got lots of variations in the pipeline and a shopping list a mile long for beads I want to experiment with! I can see a season of bug making ahead!
But for now all I have to do is sit down and write out the steps for class and do the diagrams.
Thank you Jose for the inspiration!
I'll let you know how class goes in a couple of weeks time.

Monday, 4 March 2013

bangle tower

Bangle tower
In my last post I was pondering out loud about how the zeitgeist of beading seeps in, invited or not, and you probably picked up on a slight confidence wobble. This week I've been wrestling a new design into shape, which I'll show and share soon...
but have to keep under wraps just a weeny bit longer... it's got six legs is all I can say.

Meanwhile, I thought I'd take a bit of time out and review and rummage in the beadwork box.
This  picture is of a stack of pieces from different moments in my beady life. From the top, three coral reef inspired bangles, which are layers of peyote and fringing on a loom woven base. They were made for an exhibition way back in 2004. Made using size 9 Czech seed beads, they are nicely big and chunky and go from pale at the edges to dark in the centre.

Hollow Netted beads
The biggest part of the stack is of bristling Sea Urchin bangles, the patterns for which appear in the Bead Net book on CD, which was originally written in 2007, and is still available.
I continue to wear these and it's fun to have complete strangers ask if they can stroke them! They are completely hollow, self supporting netted structures. I so loved trying all the different netting techniques from around the world when I was planning and writing. These hollow beaded beads are another project from the same book...

Between them is a ribbed bracelet, a mix of netting and right angle weave called Fandango bangle. This one has been worked in all sorts of amazing colour combinations by friends and students, much to my envy. At the very bottom is the good old Cellini Spiral, which I made not long after I'd started beading, it took an absolute age to complete, I had to go back for more beads, so it changes colour about two thirds round and weighs a ton to wear! It definitely taught me that densely textured beadwork was not going to ever be a quick fix hobby and to always buy more beads than you think you'll need!

So, did this trip down beading memory lane have any outcomes... Well in a funny way it did, it reminded me about how I still really love playing with the structure of beadwork, about how much fun it can be mixing techniques. Looking at more recent work I can see that these things are still true, and that I am happiest when 'drawing' with beads to make creatures and flowers, foliage and insects.
Mojo is back!