Showing posts with label traditional craft. Show all posts

Friday, 29 March 2013

knitty neck hugs

Oliver Twist yarn pack neck hug
In my last post I mentioned my neck hug. I wear these a lot. When I was very small, my ma and grandma used to knit 'polo' necks with an extra panel front and back which sat inside our jumpers. These were amazingly effective and designed to 'keep the chill off your chest'.
We grew up in old houses without central heating, when duvets were eiderdowns and winter mornings were a race to get dressed and yes, jack frost painted the insides of the windows with beautiful patterns.
Morph forward to a few years ago and into my passion for textiles.

Oliver
Twist
'Happy Pack'
in Orange
My lovely friend Debbie Cripps introduced me to yarn packs made by a company called Oliver Twists... you can buy them here in Debbie's store Craftdepartment.com Whenever I taught a class for Debbie at her store, I'd come home with at least one pack. The packs have lengths of different yarns carefully selected in delicious colour palettes, a definite stash favourite. My first neck hugs were worked by knotting all the lengths in a pack together, rolling it up into a ball and then knitting them as a long strip (no fancy knitting skills needed, (just keep knitting 'til the yarns all used).
To finish off, one short side is stitched to one long side to make a V and viola! the perfect knitty collar to sit in a neck line and keep you warm, whilst indulging in a lovely colour mix of textured yarn.

soft and snuggly neck hug using three fancy
yarns together
I love yarns almost (only almost) as much as beads and there are Sooo many truly scrumptious ones, but seriously, I am pants at knitting garments and way too time starved for craft hobbies that take too long.
My solution is to indulge the yarn desire with a purchase of just one ball or hank.
Current neck hugs are knitted as a short row to make the same long band, and stitched together in the same way. You can knit a bunch of thinner yarns together with bigger needles too.
I wear my neck hugs all winter because.... big reveal....
They are just perfect for showing off a beaded brooch.  I'm often asked for an instant tutorial and I've discovered that many beaders are yarn stash hoarders too.
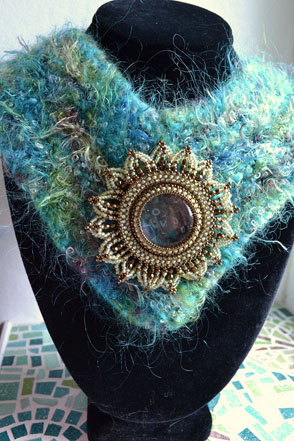
Turquoise neck hug with Winterfleur brooch

Quick tutorial
Turquoise neck hug so you can see the shape
1 or more lovely yarns or Oliver Twist yarn pack
1 pair knitting needles (2.5mm - 5mm depending on yarn thickness)
cast on approximately 15 stitches (8 - 10 for a chunky bunch of yarns.)
Knit until you have about 60cm.
Cast off.
Sew one short end, to the side of the other short end.
Pull over your head and add a gorgeously beaded brooch.

Tuesday, 27 November 2012

Rosy Ribbons

Vintage inspired beaded ribbon bracelets
I love the fashion for wrapped bracelets and my Huckeberry Buckle workshop is all about beaded ribbons and embellished buckles. I can now confess that when I first designed it was a working 'in theory' idea.
A beaded ribbon is not like a real ribbon, it is rigid, it takes up space, it needs to have room to move and it definitely hates being pushed in and out of a buckle repeatedly.
What followed was a search for a neat and dainty, yet everso discreet clasp that I could include in my design, getting me past the technical hitch stages and back into gorgeous design territory again.
Happily the 'in-line' clasps, which I now have in my little store, are perfect for any narrow beaded bracelet designs and have proved really popular. At shows I have a demonstration bracelet, which is a double or triple length wrap bracelet... can't tell you how many times I've been asked for the pattern!
So, the pattern is now included with all orders for in-line clasps, it's also to celebrate that I have a new colour of clasp in store now, to go with matt vintage bronze finish and shiny silver plate there is now a slinky dark shiny pewtery gunmetal colour too...mmm

Saturday, 4 August 2012

Tangerine and duck egg blue

Harmony by Shelley
I adore, I drink in, I cherish. I think my love of colour may have had a starting point here...These  Harmony Dripware ceramics from the Shelley Pottery belonged to my Grandmother and now my Ma.
What they are is really not at all important, how they feel, silky, how the colours glow in different lights, first warm, then cool. How from all the different blends of colour in the range some discerning ancestress was drawn to this delicate and perfectly balanced mix of dove grey, duck egg blue, tangerine and burnt orange. Utterly of their period and yet timeless... these are the completely important things.
I like the way the eye traces their shapes, and how they live together, the comfortingly fat bellied ginger jar, the narrow topped volcano vase and the open throated conical vase, easy colouring book shapes. It pleases me hugely that they can be re-arranged to create shapes and shadows. I probably stared at them, as a tired/bored little girl, in a yorkshire 'best china cabinet' in the parlour, I know my eye often wanders to them as a grown up daughter visiting my Ma.  I've yet to find the beads in these exact shades... maybe I could be invited on a colour mixing trip to Japan?... or maybe they don't exist except in these glazes for a reason. So just share with me the joyfulness of this little bit of eye candy.
detail from ginger jar
Detail from conical vase

inside the ginger jar

Sunday, 29 July 2012

Sweet Lavender

 We have had a few days of hot sunshine, such a balm for the spirits. I've wandered through my rain ravaged garden, despaired at the ruination of the roses, the jungle of bindweed and found that my lavender bushes have endeavoured to persevere. I wish I had the time to do all the home maker crafts my ma and grandma did so lovingly. On a chosen morning before the sun got high in the sky a table cloth would be spread out in the shade, the cool cream and white ceramic mixing bowls would be set out and the air would fill with he scent of fresh lavender. Our thumbnails turning green as we riffled them down the stems to remove the flower heads.
Once harvested the bowls would be left to air and the contents to gently dry, while busy hands turned tired household linens and scraps of dressmaking fabrics into little sachets.

When I grew up and finally had my own garden a very dear friend brought me ten lavender plants. As Sally Owens says 'There are some things I know for certain, always throw spilt salt over your left shoulder, keep rosemary by your garden gate, plant lavender for luck... and fall in love whenever you can'. More of rosemary another day.


I began making lavender wands just as soon as those plants matured. It starts in the spring with the gradual gathering of ribbons. Some summers I've have mountains of lavender in various stages of the process, come autumn I would sell them and use the proceeds to fund Christmas treats.

Here's how it's done:


Gather lengths of ribbon,
1 meter or more.
Harvest lavender. Bind stalks into
bunches of an odd number.
Allow to wilt, then bend the stalks over, a
gentle twist prevents stalks from snapping.

Wrap the ribbon end to cover the binding thread
then, bring it through between two stalks

Weave the ribbon over and under the stalks
to hide the flower section.
With all the stalks drawn together,
wrap the ribbon around the stalks. 
With the stalks wrapped, trim the ribbon.
Cut two tails to knot the ribbon in place.

Cover the knot with a bow of ribbon scrap
Snip the stalk ends to tidy them.
Make lots more!